This article was originally published in the April 2022 issue of 48° North.
It’s April and in the boatyard, the tide is beginning to shift. Just weeks ago, a whole day may have gone by before we spotted anyone else laboring away on some overdue maintenance project. A few fine March days and suddenly every boat seems to be literally buzzing with the sounds of sanders, tape peeling, and scrapers. If you don’t want to miss out on the glorious summer days finding hidden anchorages and prime fishing spots around the Pacific Northwest, you know time is winding down to start those big maintenance projects.
Let’s talk about the scariest one of all…. stripping your boat’s bottom. Completely removing the layers of bottom paint may be the stuff of nightmares, but it is something every boater will go through at some point, unless you’re clever enough to enough to trade-in before the need befalls you. Your boat gets hauled out and you notice behind the scuzz of algae and tenacious barnacles that more than one chunk of bottom paint has come loose. Or worse, there’s a suspicious blistering hidden beneath, and it’s gotten extensive enough that fixing one or two patches is not enough anymore. Once you’ve gotten past the grief of realizing, ‘It’s time,’ here are some tips to make the process easier on you and your boat.
Your goal is to remove all of the layers of paint (and/or gel coat) that were having an adhesion problem, and leave a clean surface and a fair hull ready to receive primer, and eventually fresh bottom paint. Along the way, focus on keeping clean by containing the paint, dust, chemical, or other residues to your work area for proper cleanup. Finally, aim to not break yourself in the attempt — exhaustion and frustration just leads to mistakes and sloppy work.
Before you begin tearing into that old paint, start by preparing for the whole process from the first scrape to the last sweep up. Use the ‘Mise en Place’ philosophy of French cooking: have all your ingredients measured and cut, then placed easily at hand before you even turn on the stove.
1. Have Materials Ready: There have been recent supply-chain hiccups with paint products. We waited several months to begin our strip jobs last fall until we could get enough primer and paint on hand. See if your supplier offers a low-temperature curing primer to ensure weather won’t deter you from getting a protective coat on a newly bared hull. Don’t let a bare hull sit without at least one coat of primer.
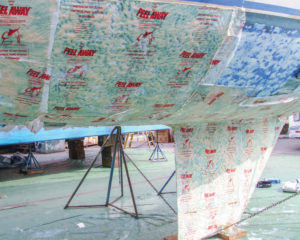
2. Site Prep: Most boatyards are understandably strict about the byproducts of boat stripping making its way into local waterways. Whether using mechanical or chemical means, get a clean workspace set up with tarps to seal in your hull, with proper disposal means for the byproducts. Keeping the job clean ensures boatyards continue to operate and keeps rates lower. Plus, it makes it less stressful for you when it’s time to paint. Consider how you’ll keep water from running down the hull, including from the thru-hulls that drain from an open cockpit. Short pieces of vinyl hose in thru-hulls helps move water away from your work area.
3. Safety: This stuff gets in your hair, under your nails, in your clothes, and (most concerning) in your lungs. Old bottom paint and antifouling is no joke. Get properly rated full face respirators, gloves, etc., and use them. Those Tyvek suits may look like they’re from a Sci-fi B-movie, but if nothing else they’ll prevent leaving clouds of toxic and irritating paint dust in your car, home, or boat cabin. Consult the Material Safety Data Sheets (MSDS) for the products before you begin, and use the correct levels of Personal Protective Equipment.
4. Test: For any process you use, start with a small test patch to get your process figured out and see if the end result is satisfactory with your chosen methods. That includes painting your test with the primer/ bottom paint to see if there are adhesion issues after the strip.
Note: Sandblasting, soda blasting, shell blasting, or water-based “ecoblasting” services are available at most boat yards and are the best option for stripping down to the bare hull. It takes expensive equipment, a very steady hand, and comprehensive cleanup to do these jobs properly. Generally blasting is best left to the professionals. If you can afford it, we encourage this route for the best finish.
If you are going to undertake a stripping project on your own, the approaches and recommendations vary depending on your hull material.
Fiberglass
Fiberglass hulls have two types of strip jobs, and your methodology will differ accordingly. If you’ve got bottom paint adhesion issues, you’ll be stripping down to the manufacturer’s gel coat. On the other hand, widespread blistering throughout the hull indicates that the gel coat itself is compromised and must be removed. For a blister problem, you will be stripping down to the bare fiberglass to reapply a barrier coat in addition to bottom paint and antifouling.
Chemical paint strippers are the best option for stripping fiberglass hulls down to the gel coat. You’ll save your back and your sanity, and the cleanup can be far easier if done properly. Many of the biodegradable options do better on bottom paint than the harsher foul-smelling options, they’re safer for you and easier to work with overall, and they’re far less likely to interact with the gel coat. Any scrapers used to lift the paint once it’s softened need to have the pointed corners sanded or ground down to prevent damaging the gel coat or hull. For cleanup, keep in mind that as soon as you walk on the blue tarp under the boat it’s no longer waterproof due to the abrasion and tears. Lay down plastic sheeting or tarps that can be bundled up and disposed of.
Unfortunately, most strippers want higher temperatures to work in than we regularly get here. This will cut into the small summer window we treasure here in the PNW. There are some that work as low as 50°F, but many want at least 65-70°F minimum temps. Perform the test patch to figure out what the right paint stripper products and timing are at the given temperatures you’re going to be working at.
Let’s say you either need to take off the gel coat, or the temperatures are too low for chemical strippers to get to the gel coat in the first place. Your next option/step is mechanical stripping via sanding. You will start heavy-duty with 16 or 24 grit sandpaper. At these rough grits it will almost feel like you’re grinding (some industry folks may even refer to it as such) but any angle grinder will unnecessarily compromise your hull and should not be used. The moment you’re through to either the gel coat or bare fiberglass (depending on your desired depth) stop. Move up to 40 or 60 grit to get the last residue off. From there it’s paint preparation sanding. Work your way up through the grits to the recommended roughness for your paint primer. Remember only to go to that recommended roughness and no higher. It may seem like smoother is better, but these paints and varnishes need something to grip and leaving it a little “fuzzy” gives the primer better adhesion.
Mechanical stripping options also include utilizing gel coat stripping tools. These power tools are set like shallower power planers with harder cutting tips to deal with tough resin gel coats and fiberglass. Remember for any mechanical method, you don’t want to end up using such a harsh method that you compromise the hull shape. However, you also don’t want to be so fussy that you spend ten times as long doing the work, wear yourself out, and inevitably start making mistakes. Strike a balance!
Wood
Stripping a wood hull has many of the same concerns as fiberglass. Instead of worrying about compromising the gel coat, you’ll be worried about damages to the wood fibers. Scraping or heavy mechanical stripping are more likely to cause gouges or damage the caulking. So, utilize the same method of sanding starting at 16 or 24 grit and working your way up once you see the wood beneath the old paint. Be especially careful of over-sanding and ruining the fairness of the hull. Wood may be the thickest hull type, but it is also the softest. Likely you’ll end up spending plenty of time with the fairing board if you get too sander-happy, which will quickly teach you that lesson. There’s a couple of stripping power tools, similar to the gel coat strippers, that may work for wooden boats too, but again be careful. Some options may be too aggressive and
damage the wood’s cross grain fibers or hull fairness. Test patch.
Test patch. Test patch.
As for chemical stripping on wooden hulls, the option is there but there are significant risks. Since wood is porous, it could stain badly or there will be issues with residues soaking in the grain that prevent the primer coat from adhering. Do your research and talk to your local wooden boat expert, but we don’t typically recommend this method.
Metal
Ah, metal hulls, the one material that can take a mechanical or chemical pounding and just keep on going. Well, except for that tricky weakness to standing water. Metal hull stripping methods can follow either the mechanical or chemical processes we recommended for stripping through the gel coat on fiberglass. However, for getting within the correct operating temperatures for chemical strippers or paint you are going to have a tougher time keeping the hull warm enough with heaters. Whereas fiberglass or wood have insulating properties, metal is highly conductive, which will let heat escape much faster if the decks are exposed to cold air.
It’s a lot to think about, and stripping is always a hefty project. But all in all, keep in mind that with regularly applied and properly maintained bottom paint, you shouldn’t have to strip the bottom completely for another 20 years or more. Take care to do it properly now and stave off a repeat as long as possible. Happy spring stripping!
Alex Wilken is a lifelong cruiser, professional shipwright, USCG licensed captain, and is one of the owners of Seattle Boat Works.