From the April 2021 48° North Issue.
To keep everything working on your summer cruising adventures, spring is the perfect time to learn more about and test your boat’s electrical systems.
I like to say your boat has two beating hearts — your method of propulsion (engines and/or sails), and the power system that makes it all possible. Understanding that power system is critical to safely operating a boat, enjoying your journey, and relaxing along the way.
Understanding Your System
Figuring out how your boat’s power system works should be high on your priority list. This should include basics, such as: the type and capacity of each of your battery banks, how each one is charged, what each bank is connected to, and any switches or devices that combine or separate the banks. Unfortunately, developing real understanding of these nuances requires a manual process that involves some trial and error, depending on whether certain components are hidden or hard to reach.
I usually start with the basics — finding all of the batteries and banks and inspecting each of them. Take pictures of the battery labels and capacities so you can look at them later, note any date codes on batteries, and track down batteries for things like generators and thrusters, which can be harder to find (or even hidden!) compared to your house bank.
As you investigate your system, spend the time to label everything you find, if it isn’t already. Clearly label individual wires or connections at both ends, as well as any switches or devices that can be manipulated. It’s especially helpful to add “state” labels near these sorts of devices so that in an emergency or panicked moment you know what switch is supposed to be in which position to do the thing you want it to do!
Documentation Tools
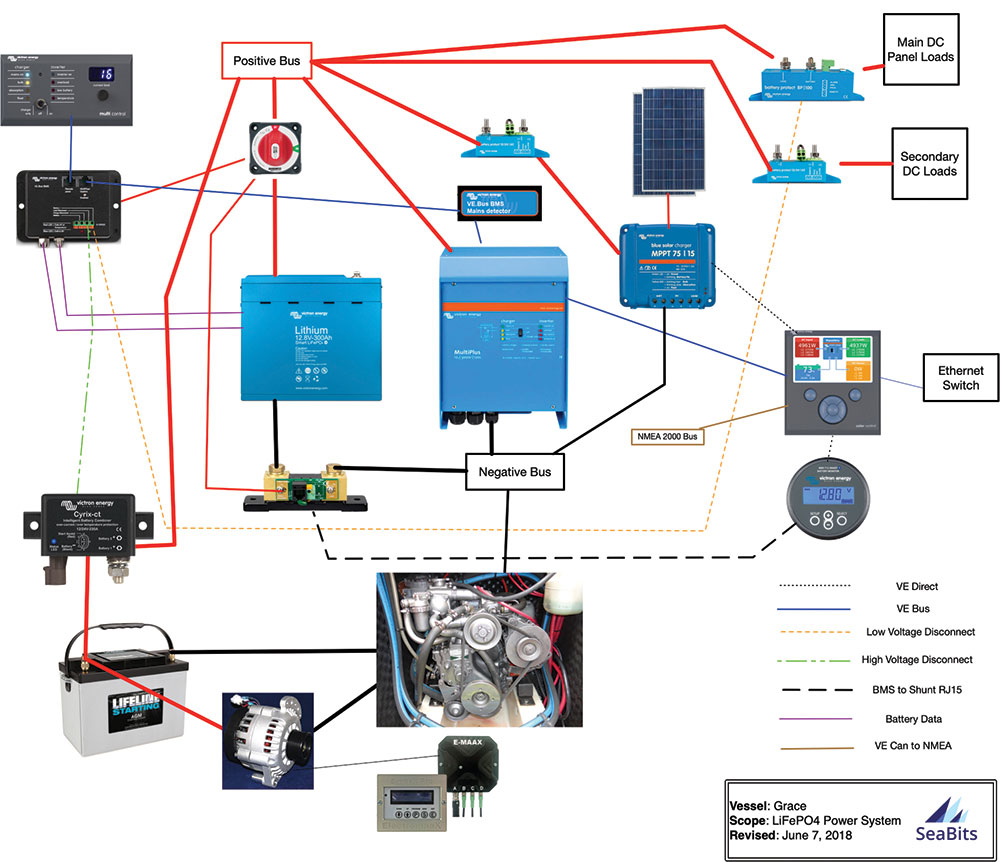
Once you understand the basics of your power system, take a few hours to document it. This can be as simple as something drawn out on a piece of paper with the batteries, sizes, connections, and charging sources. Or you can get a bit more detailed and create what is called a single line diagram. This is like it sounds; a simplified diagram showing a single line for the key parts of electrical flow and all of the components involved. I find it helpful to add things like flow arrows, which are not usually found on traditional single line diagrams, showing which way the current flows for typical operations. This can help you understand what should be charging and the sources of that charge. You can also create multiple versions of these documents to show what is being used at different times — while charging at the dock, underway, and at anchor.
Single line diagrams can be a bit complicated for those without an electrical background, as they can use specific electrical symbols to represent things like circuit breakers, fuses, and the like. Use whatever works for you to represent how things are connected.
To create a single line diagram, you can use Visio for Windows, OmniGraffle for the Mac, or a host of other apps for tablets and smartphones. There are also web-based tools like SmartDraw which are even more powerful and easier to use in many cases. You don’t have to use electrical symbols unless those are familiar to you — after all, this documentation is primarily designed to you. Creating it this way allows you to update things easily and produce different versions of it depending on the scenario. Consider laminating a version of it and place it near battery switches or electrical components to remind you how it all fits together.
Testing Your System
The next step is to understand how your system performs in each major mode. This can be done at the dock, and I highly recommend doing this ahead of time, documenting baseline performance. I also recommend doing this every year at the start of the season. Not only does this remind you of how it works, but it puts the system through a good test before you’re out on the water somewhere needing service.
Test your system in the usual ways you use your boat. I use the following: at the dock, underway, at anchor charging, at anchor during the day, at anchor during the night. You’ll need a way to record your test results such as a notebook or spreadsheet, a good idea of what you have on/off during these times, and a bit of time.
I recommend recording as much information as possible so that if you need to go back later on, you don’t have to re-run the tests. This can include battery voltage readings, amp draw, amp hours, the devices turned on/off, which scenario you’re testing, and any helpful notes. It’s also helpful to gather data from more than just the house bank batteries. Consider whether the generator or engine start banks are being charged; if you have thrusters, try running those for a while and checking their battery banks as well.
I do the tests in this order: at anchor-day, at anchor-night, at anchor-charging, underway, and then at the dock. This way you get a good idea of what happens when you come back from being out on the water, and how the charging sources work throughout the process.
Start by either disconnecting your shore power connection or disabling it with a selection switch, depending on what you have. Once you’ve done this, verify you’re operating off of battery power. I start with at anchor-day because that is when the largest loads will be on. I’ll usually turn on a smattering of lights, the inverter (if it is not on already), plug in a computer or phone or two, run the water pump, etc. You can record each of these activities, or try to get an average for the amount of amps you’re pulling for daytime activites. Keep in mind that after sunset, and particularly in winter, you’ll use more power for lighting.
Once you have info from that test, you can proceed to what the boat would be like overnight. This could include the anchor light being on, one or two courtesy lights, and generally everything else off. Keep in mind that many people leave their phones, tablets, and computers plugged in overnight, which is a significant AC draw on your inverter.
I generally let these tests run for at least 30 minutes per mode and record some averages throughout the process. This gives you a much more accurate picture than just a quick few minutes, as there may be less frequent things that run, such as an electric toilet or water pump, that still consume quite a bit of amp hours. This also drains the batteries enough to make the next test worthwhile.
As boaters everywhere prepare for a busy cruising season, these testing and documentation efforts are a worthy spring project. Consider it the maritime version of a coronary check-up.
I always test being at anchor and charging to make sure things are working properly here, not just every season, but usually before I leave the dock after being back for a while. Charging at anchor is one of the least efficient methods of charging due to the size of battery chargers and systems. This can result in long hours of generator run time, and it’s important not only to validate the charging system is working well, but that the generator is up to the task.
I do this test with things turned on in a normal daily use pattern, and I try to load the generator up with as much as possible to test the charging system and the generator itself. Let it run for a good 10 minutes and confirm that charging is happening at the right rates, the generator isn’t heating up too much, etc.
Testing underway can be a bit challenging while at the dock, but you can do a pretty good job without too much fuss. Make sure you turn on all of the equipment that you would use while underway including chart plotters, PCs, radar, depth sounder, and all other navigational instruments. Also turn on convenience stuff such as the inverter, lights, and other things passengers would use while you’re underway. Make sure you’re still disconnected from shore power, and start up the engines in neutral. Try to increase RPMs until you have a decent amount of charging happening from your alternator(s) or other sources that are related. This is one of the most revealing tests, and usually shows pretty big gaps with charging keeping up with usage.
Let the batteries discharge a bit more before doing the final test for shore power / at the dock. This is just to ensure your setup is charging things well while at the dock after being out and having slightly discharged battery banks. Make sure to check all of the banks after a while if you have combiners, relays, or other things that will also top up other batteries.
Once you have all of this data, I find it useful to have a very brief, laminated copy of what to expect for charging/discharging rates taped near the electrical panel for each of the modes. That means just a quick glance to see if things are normal, and also help others who might not be as familiar with your system as you are.
Not only is all of this information invaluable in a crisis, but you can share it with your electrician when they visit as a way to speed up work on the system. You should insist on getting updates from them as part of the work, and you can even have an electrician produce these documents for you from scratch if you’re willing to pay for it. Understanding your electrical system will go a long way in providing peace of mind and reliability while enjoying your time on the water.