I grew up boating with the idea that you should keep everything simple and manual, and indeed, there are many valid reasons to honor this approach in 2026. Yet as my experience has grown to more than sixty years of sailing, I have been in many situations in which an electric or hydraulic windlass saved the day. In addition to being a significant quality of life improving convenience, today’s powered windlasses are extremely reliable—trusty enough to assure most of us whose sensibilities favor simple systems and self-reliance. The installation, however, may not be quite so simple, and will make the difference later as to how smoothly anchoring goes. The little details have an outsized impact when tolerances are small and loads are significant.
The installation of a windlass has two elements: the things about which we can make choices, and others which were chosen when the boat was built or when the naval architect began drawing. The big choice is between a vertical windlass (VW) or horizontal windlass (HW). Both have pros and cons, but some of them are influenced by boat design.
With a VW, you can put the motor below deck, out of the weather. This below-deck position results in less obstruction on the foredeck, and the 180° wrap of chain around the wildcat (sometimes called a chain wheel or chain lifter, it is the mechanism that holds the chain within the windlass). A HW often has only a 90° wrap, which gives less secure wildcat contact. The VW’s more secure grip will also give a better possibility to use a chain with spliced rope attached rather than all chain. Windlasses provide the possibility to warp lines such as dock lines to bring you into the dock against strong winds—it may be possible with either orientation windlass, but with a VW with a capstan on top of the wildcat the lead is typically more flexible. Additionally, the chain lead angle is more forgiving on the VW.
Each boat is unique, and it is more important to design a system that works smoothly on the particular boat, considering its specific foredeck layout, rather than to prioritize a preference for vertical versus horizontal orientation. The two main differences are whether the rode will be fed below into a locker with some free fall, or if it is stowed in an anchor well under a deck hatch with little or no free fall. The free fall situation is pretty straight forward—the rode, be it all chain or a combination of chain and rope, should feed down and up through the hawse pipe without jamming or catching in either direction. Note that with a rope and chain rode, the use of three-strand line can cause difficulty if it is stiff. Even when it starts out supple, it will stiffen with repeated strain. The use of multi-plait rope will avoid this, but you need to be conscious of its comparatively lower resistance to abrasion than three-strand line.
The free fall path of the rode should be forward and away from the bulkhead, or the rode will collect and pile up more quickly against it, shortening the free fall. The decision to use all chain instead of chain spliced to rope, as it pertains to the windlass installation, will influence the choice of horizontal with 90° wildcat contact or vertical with 180° contact, and critically whether the wildcat is designed to handle both chain and rope. If you use a combination rode, the best rope for spicing into the chain is multi-plait instead of three-strand.
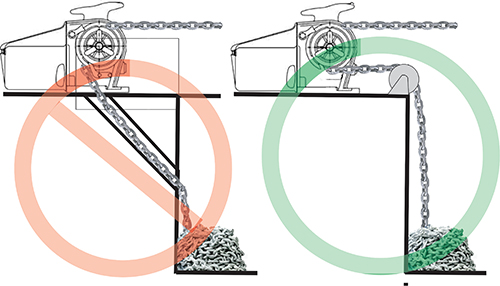
Some years ago, we bought a 50-foot steel ketch that had a big chain locker in the bow and a robust horizontal windlass. The HW fed below through a hawse pipe that was 1¾-inch by 10-inches long and led forward at about a 60-degree angle. (Figure 1) This all looked good but was a disaster. The 3/8-inch chain would pile up quickly against the locker’s watertight bulkhead below, and the inevitable rust that would build up in the steel hawse pipe caused the chain to jam in it as soon as the length of free fall decreased. This same design on a big ship would work fine, but it was not scalable. The result of this was a jammed and disabled windlass in the middle of a 90-knot unexpected hurricane. We were unable to get the boat to a safer part of the harbor and spent an uncomfortable and troubling eight hours bow-in on a concrete quay. Luckily the steel bow won against the Spanish concrete.
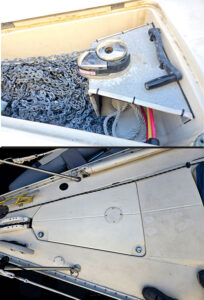
The deck anchor well is its own situation. Unless you have a very small boat with a gorilla on the foredeck who will manhandle your ground tackle, a windlass is still a great help. Figure 2 shows an installation that is completely under the anchor well hatch, leaving the foredeck free and clear. There is a compromise of course: the chain has only a few inches of free fall. This requires that it be flaked or shifted forward by hand as it comes up. This works easily with 1/4-inch or 5/16-inch chain but would be less doable with larger chain. We have this setup on our 1979 Yamaha 33, and it works without problems for the crew.
It is important to know the grade, type and size of the chain used, as well as the rope diameter, if used. The grade and type of chain will determine the size; and from that, you will know the weight per foot. This will allow you to calculate the total weight of the rode, shackles, and anchor, which allows you to choose the adequate wattage motor. Typical chain grades are G 30, G 40 or 43, G 70 and the types are Proof Coil, BBB, and High Test. A windlass’s wildcat will typically be grooved to fit one type and size of chain.
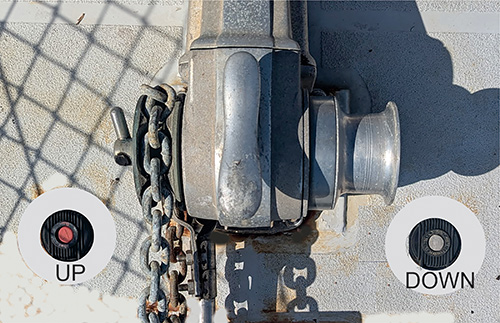
Turning the windlass on and off in the up or drown mode requires a switch or switches. For manual switches near the windlass, they can be hand or foot/knee activated. Two-position switches work well by hand, while separate ones are often used by foot. (Figure 3) Remote controls, both wireless and wired, are also widely used. The switches need to be sealed from the elements and the control box to which they connect must be below deck in a place void of condensation or other liquid sources. In other words, keeping the electronics dry will be critical to the reliable functionality.
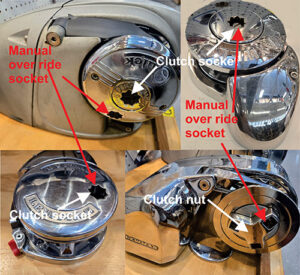
The down mode for the anchor rode can usually happen by disengaging the windlass’s clutch. Each manufacturer locates the clutch release for the position where it works the best, but usually they are between the wildcat and capstan, above or to the side of the outermost wheel, or next to the wildcat when there is no capstan. (Figure 4) It is important to be sure there is space for unobstructed operation of the clutch. The manual override that allows you to bring up the anchor even when there is no electrical power available to the windlass also needs equal operating space.
Many years ago, we were in Italy near where one of the popular manufactures of windlasses was located. Another yacht captain told us a story about his windlass. He had initially installed one of their windlasses which had an aluminum case and was white powder coated. Over time the case had corroded away and left the powdered coating shell in place. When they discovered it, they took the whole thing up to the factory. The manufacturer moved all the working parts over to an anodized aluminum case, and they were off to the seven seas. Personally, I can vouch for the non-powder-coated windlass as I had one for forty-plus years without problems, and it probably did not get many fresh water washdowns.
Any installation can benefit from a washdown system. Having the facility for a fixed mount and handheld operation with quick and easy coupling and uncoupling of a hose fitting gives you the best of both worlds.
Once you get your windlass installed and the rode ready to deploy and retrieve, don’t forget to make sure you have a secure fixing or anchor point in the deck well or chain locker to terminate it. Regardless of whether you use all chain or a combination rode, it should finish with a short length of adequately sized line that is spliced to easy-to-remove shackles in the case you need to release your ground tackle on purpose but not by accident.
Jack Wilken wrote the How-To column in 48° North for more than a decade. He spent his career as a USCG-licensed Captain and shipwright, and he founded Seattle Boat Works in 2008. Though now mostly retired, he continues to write and consult with the family business. He’s still a happy and avid cruiser as well.