From the April 2021 48° North issue
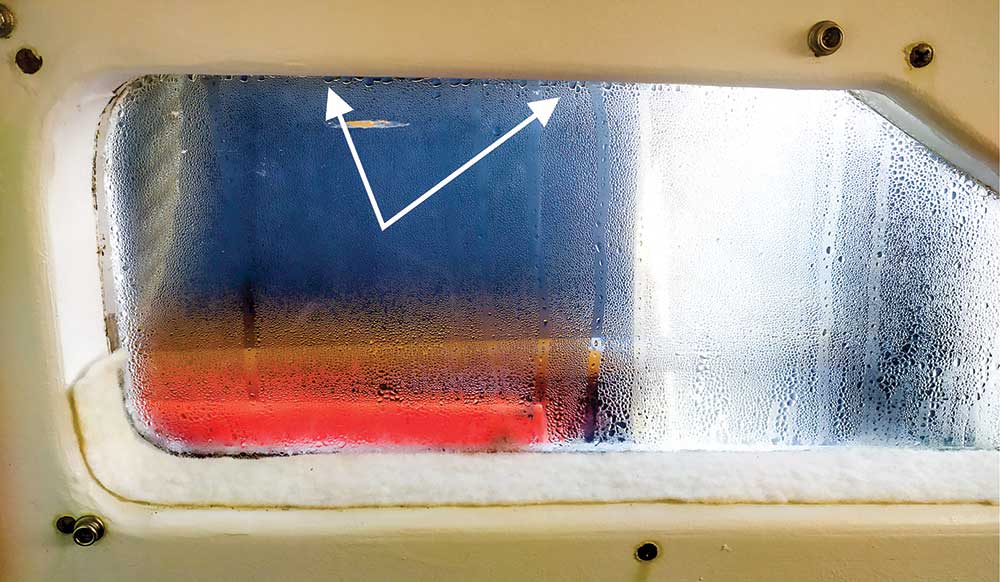
Spring is here, but outside it will still be predominantly cool and wet for a few months. Conversely and unsurprisingly, we would prefer the inside of our boats to be as warm and dry as possible. Whether you liveaboard or you’re setting off for some springtime cruising, humidity builds up inside the boat from our breathing and cooking. When it is humid, the windows and portlights present a problem since they are almost always single pane glass, acrylic, or polycarbonate and the temperature differential inside and out creates condensation. Sometimes, there is metal around the pane too, and this all provides a cold surface to pull the heat out of the interior air, as well as a place for the moisture to condense and eventually drip all over the interior (Figure 1).
In addition to being unpleasant and a source of heat loss, this creates plenty of potential for water damage and mold. (Hatches have the same problem, but we found a solution for this which we covered in our December 2011 article ‘Eliminating Dripping Hatches’).
We have recently discovered a simple and cheap solution made for house windows that worked surprisingly well on our liveaboard boats. It is a good one to try for a few months this spring, with the intent of installing it once again for the winter in October or November.
The solution uses the same principle as any typical double pane window. By creating an insulated space between the two extremes via a dry, sealed air pocket, we reduce the temperature differential, heat loss, and available cold surfaces for condensation. We could accomplish this by either affixing external covers like we do with hatches… but we’d guess that, like us, you like to see out of your windows. The alternative involves affixing a sealed, clear plastic sheet over windows creating an insulating air space via a pseudo double pane. Don’t worry about degrading your views through cheap plastic though! A landlubber friend who spent many damp winters in cheap Seattle apartments tipped us off to the window insulation kits for houses that use shrink-wrap plastic to create a glass-clear finish so we can still get as much winter sun as possible.
To do this you will need:
- An X-Acto Knife
- A Window Insulation Kit, usually marketed for house windows and available from various retailers starting at $10 — it should include a sheet of clear plastic shrink film and double-sided window tape
- A Hair Dryer, a heat gun is too strong for this application
- Rubbing Alcohol
- Towels
Once you have gathered all your materials:
- Make sure the window and the area to which you will be affixing the double-sided window tape is clean and dry. For example, we had to scrub soot from our heating lantern off the wall and then wipe the window moulding to get dust off. We recommend a wipe down with alcohol on the whole area — if it won’t hurt the finish — to clean the window “glass”, prep the taping area, and kill off any mildew that may have shown up.
- Get the boat dried out and warm! We chose to apply these window treatments at the end of a week of warm weather, and even ran the heater with the hatches open to really get our boat as dry as possible. Any condensation will keep the tape from sticking, and any moisture in the moulding or on the window will be stuck in there once the treatment is applied.
- Apply the double-sided window tape around the window. You’re essentially creating a gasket, and it doesn’t matter if it’s close to the edge of the window as long as you can get the tape consistently around it on a flat surface. The plastic sheeting will go over whatever is inside like Saran wrap. Leave the backing paper on for now.
- At the tape intersections, use caution. Be careful not to trap backing paper under a top layer of tape. With a bit of attention, you should be able to have the intersecting tape laid flat and sticking to the moulding. Then, put the paper back down to protect the sticky top side until you are ready to apply the plastic.
- Using a hair dryer, warm up the tape and use your hands to press it down in firm strokes. This step might be optional for some, but most marine finishes are glossy and resist being stuck to. This extra step helped our tape really stick down firmly before applying the plastic. Without heating it up, the tape started detaching.
- One window at a time, peel the back of the tape off and then apply the plastic sheeting. You can apply from the whole sheet or measure and cut out a piece that fits your window— give yourself at least an extra two inches on each side! Since boat windows are rarely flat and square, we often skipped cutting out smaller pieces to give ourselves maximum error room. You have to get the whole window in one piece or it won’t seal, and once the plastic sheeting touches the tape it often will rip the tape off the wall if you try to pull it up.
- Go steady and slow to get as few crinkles as possible, pressing the sheeting into the tape firmly. If you get some creases or crinkles, don’t worry too much! Focus instead on getting the “gasket” completely and firmly sealed with the sheeting. We’ll work on wrinkles in the next step. If you have any really big folds, use a bit of tape to pin it down and seal it — or you may have to start again.
- Now comes the magic. All this plastic sheeting has similar properties to heat shrink wraps, so you’re going to use the blow dryer to get it nice and tight. This will both get all those wrinkles out and make the sheeting look tidy and pristine, but it will also remove the cloudiness and give you a glass finish to look through. Experiment with the blow dryer held at different heights, angles and speeds to use the shrinking properties to get it glassy and flat. Our favorite way was to go down the center of the window in a nice, slow pass, then hold the dryer at a 45 degree angle and work our way out to the edges in long slow passes. Be careful not to get too close, and check with your hands how hot the window moulding is getting to avoid damaging it or heat-shocking the window pane.
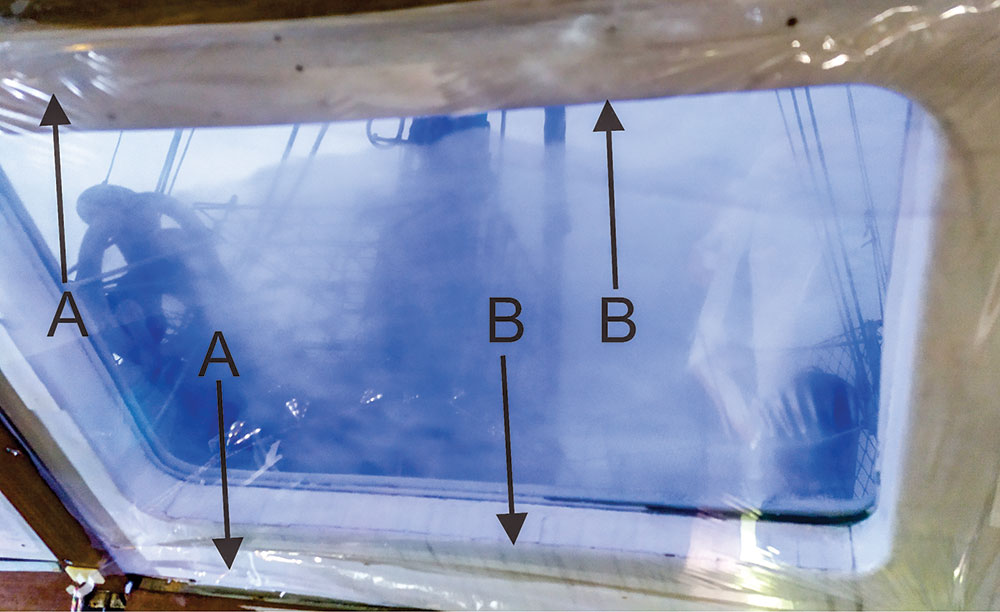
- Let everything cool down. Then use the X-Acto knife and trim the excess plastic around the edge for a clean finish (Figure 2). Avoid cutting down and scratching your paint or varnish. Instead hold the excess at a 90 degree angle from the wall. Then hold the knife parallel to the wall and drag it along, letting the tension do the cutting and keeping the knife away from the wall.
- Done!
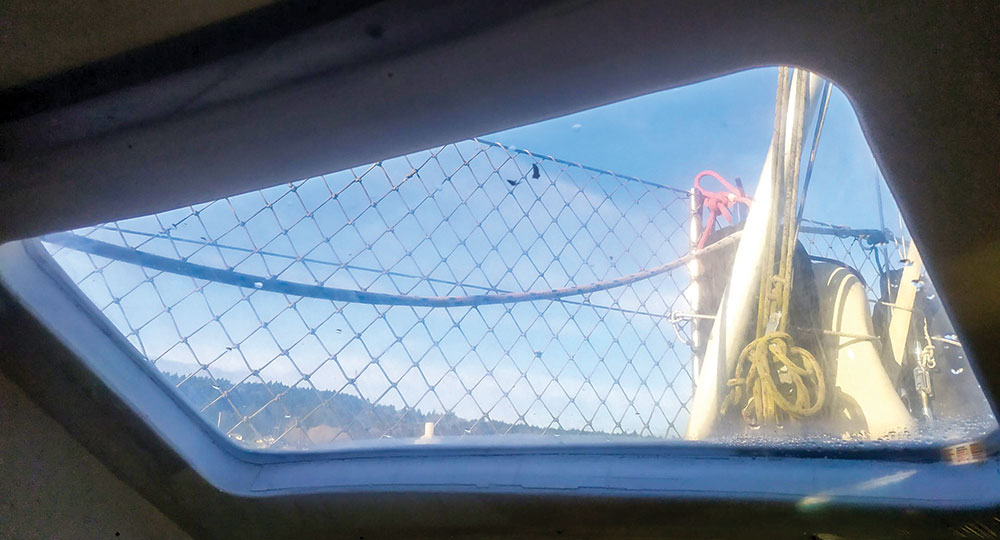
Even after many weeks, there is very little moisture in the air space behind the plastic. There is a little condensation due to our boat’s wood window trim, but it has not increased nor is it enough to form drips, and keeps the inside of the boat dry and warm. For the fixed-closed windows, it is so clear and unobtrusive that once we had applied it, we had trouble getting visitors to see it even when pointed out, as it’s all but invisible.
We’re looking forward to experimenting with this technique in the future. Applying it to the exterior instead of the interior of opening portlights might provide a similar solution, since otherwise you can’t get the same air pocket from the inside.
If you have ever had issues with window drips, we encourage you to give this a go, whether it’s this spring or this coming fall. We only wish we’d discovered this solution years ago!