Have you ever noticed an old and badly neglected sailboat at the marina or boat yard or that grabs you and pulls you in? One that calls to you beyond just the fiberglass and weathered teak, making you feel some salty combination of pity and lust, and begging you to give her a new life?
Well, I am that weak guy who just can’t walk away. After more than a dozen sailboats, the desire to restore these works of art has become even stronger. Just as I’ve finished up the restoration of one, I’ll stumble onto another one that looks to me for help. You’re reading 48° North, so maybe I’m preaching to the choir. My friends and family have told me I’m crazy, but I know friends that restore old cars and nobody considers them crazy. Maybe I am crazy and it has nothing to do with sailboats.
On many of my restorations, I’ll finish off by making a cockpit dodger for the boat. In the past, I’ve installed a half-dozen canvas dodgers with prefabricated frame and skin kits. Those kits are a good product, but they’ve gotten so expensive over the last several years that I’ve had to rethink the whole process of making dodgers. With limited funds and even more limited intelligence, I realized that a different type of dodger could be used — something simple, strong, attractive, and inexpensive. And something that was bulletproof (figuratively, and potentially literally) could also be handy. That’s where the idea of Lexan or polycarbonate came to mind (Lexan is a brand of polycarbonate). By making my own frame and using Lexan sheets, my experimental dodger project was launched.
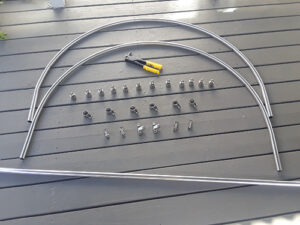 The frame was relatively simple. I just decided where I wanted the frame ends to be mounted and measured the distance between them. I bought three 8-foot aluminum tubes from Home Depot and took them down to my buddy Earl, the sole proprietor of Earl’s Muffler Shop and Gun Repair. For a case of beer, he went ahead and bent the pipes in an even arc so that the ends were at the same measured distance I had decided on ahead of time.
Aluminum tubing for the frame can be used instead of stainless steel due to the support from the shape of the dodger. One inch aluminum frames are more than adequate in strength and much less expensive than stainless. In fact, the overall strength of this type of dodger with aluminum is much greater than a traditional canvas dodger with a stainless frame.
The fittings for the frame came from a combination of online retailers, both marine-specific and not — from Fisheries Supply to Amazon. The remaining aluminum tube was cut using a small-tooth hacksaw and used for the frame bracing. Similarly, I cut down frame arcs and bracing to the proper lengths to create a dodger shape that would blend well with the contours of the boat. The most important rule here is to work slowly and cut small amounts at a time for the final fit. Through trial and error I’ve discovered that, once cut, aluminum pipes are difficult to glue back together again.
 As ever, when fastening or bedding anything to your boat’s deck and house, take pains to negate water ingress. Techniques for this would require a separate article, but suffice it to say, a quality, dry seal is important, even under the protection of a dodger.
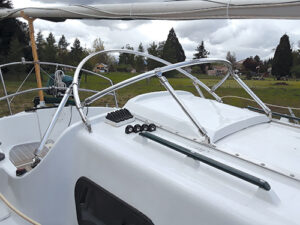
With the frame completed and secured, I needed to make a pattern for the Lexan sheeting that would go over it. I just used some Visqueen sheeting that I temporarily taped tightly over the frame and marked with a Sharpie pen. Remember to mark the pattern about an inch beyond the frame for the top portion sheet of the dodger for later attaching a cosmetic edging with a cut white cable cover (more on this later).
The Lexan can be easily cut with a fine-tooth jigsaw. Polycarbonate is great stuff and nearly impossible to break, and so much easier to use than acrylic or Plexiglass sheets, which can shatter.
Now that the patterns are cut for the top and the front of the dodger you can attach them to the frame using aluminum rivets. The metal of the rivets must match the aluminum metal it attaches to. Simply start from the center of the arcs and slowly drill and rivet every six inches or so while bending down the Lexan and working towards the ends on each side. Some folks like to have sides on their dodgers and this is easy to do. To make this work, take a larger scrap of the Lexan, hold it up the the side you want to cover and, with your Sharpie, draw the shape of the side piece; then cut it and rivet this onto the aluminum frame.
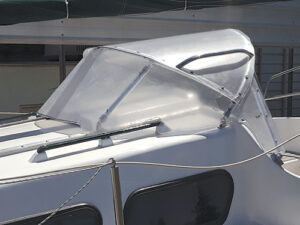
Now for the dodger color and windows. Lexan sheets normally have a plastic protective film covering on both sides to reduce scratching during shipment. Take advantage of this and don’t peel it off right away. Draw out on this film where you want the windows to go. Take a sharp knife or box cutter and, using a straight edge, carefully and superficially cut through just this film along your marked window edges both on the outside and inside surfaces. Carefully remove all the film surrounding the windows. Let me repeat: make sure that you leave the protective film on the areas that cover the windows.

Once the peripheral areas of film are removed, you can reinforce this window edge with painter’s masking tape before gently roughing up this exposed surface a little with a fine grain sandpaper before one final cleaning. Paint this peripheral area leaving the film on for the windows. For painting my dodgers, I use leftover matching two-part polyurethane called “Perfection” from Interlux that I had lying around after some trim work. If you want to have the dodger look old-school, you could actually permanently glue a sheet of Sunbrella over the Lexan sheet to make it look like a canvas dodger. I haven’t tried this yet, but might on my next boat.
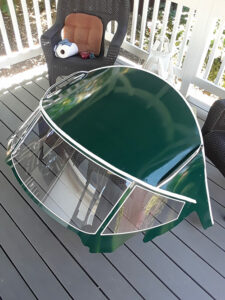 When the paint is dry, remove the film over the outside and inside window areas. A little trick I’ve learned is to run a ¼ inch pinstripe along the margins of the windows. It really cleans up the look to a more professional level. To finish the edges for the top portion of the dodger you can also take a white cable cover and slide and glue it over the edges of the top sheet where you previously cut an extra inch. Additionally, if you like, you can add stainless grab handles to the sides of the dodger, which also gives it even more strength.
I’ve now made dodgers in this style for a little Halman Nordic 20 and a Catalina 25. I can honestly say that these have been enjoyable learning experiences for me; and I’m confident that this is a cost-effective and handsome alternative to traditional cloth dodgers, and a project that can be completed by nearly all sailors.
DODGER DETAILS
Here’s a run down of what I paid for my most recent dodger:
- 3- 8’ X 1” Aluminum tubes/pipes, $46 (Home Depot)
- 6 – Jaw Flanges, $62
- 6 – Bases, $37
- 12 – Eye Ends, $32
- 1/8 “ Lexan Polycarbonate Sheeting, $144 (Home Depot)
- 2 – ⅜” Shroud Cable Cover, $5 (Fisheries Supply)
- 2 – Stainless grab handles, $45
- Aluminum Rivets, $4
- Paint, $20
- Case of beer, $21
- Total: $416
The project may at first seem overwhelming but believe me if I can do it, I know you can and probably better. The secret is to take it slow and make it fun. Remember my work-ethic rules:
- Never be afraid to make mistakes.
- Never admit to making mistakes.
- Work alone so no one sees you make mistakes.
- The best craftsmen are the best at hiding their mistakes.
- When someone spots one of your mistakes, always say to them, “That’s how I wanted it to look.”
Mike Swesey is a long-time sailor and author who calls Newport, Oregon his home base. He is old and grumpy most of the time, and is unapologetically addicted to the roll of the sea.