PART 1: A PROPER PRE-START CHECKLIST
From the May, 2019 issue of 48° North.
Whether it is the main engine or a generator, any engine has a checklist of things to go over in the course of normal operation, as well as regular maintenance to keep it running. Keeping up with this can seem daunting, particularly if you don’t have a reliable checklist to work from. In this article, we will go over what should be on the diesel engine start checklist. Next month, we’ll use this checklist as the foundation of our regular and long-term maintenance recommendations.
The Engine Start Checklist:
Every time before starting your engine, at least for the first time that day, check the following:
1. Key Fluid Levels: engine oil and transmission oil (if applicable), and the coolant level
2. Belt tension
3. That the engine seacock is open and the raw water strainer is clear
4. The fuel level and the fuel filter
5. Starting battery voltage
6. The throttle and shifter connections
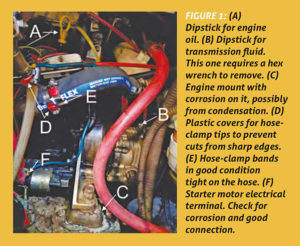
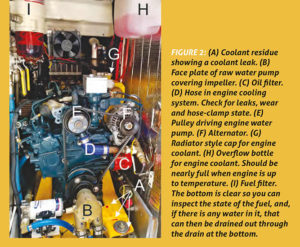
7. The engine generally for signs of wear, corrosion and/or leaks (Figures 1, 2).
8. Once the engine is running and in gear, recheck the shaft seal.
Checking Fluids:
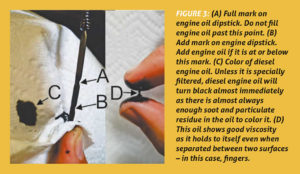
To check the oil level you must find the dipstick (Figure 1), remove it, clean it, reinsert it, and pull it back out to see if the oil is on or between the full and add marks on the dipstick (Figure 3). Diesel engine oil is normally black, but it should have no visible particles. You can check the viscosity by watching how much it holds to itself when you pull your fingers apart (Figure 3). If the oil is not clean or the viscosity is too low, it should be changed. The engine manufacturer will have a recommended period for oil changes, but it is normally best to change it at least once a year at the start of the sailing season. The transmission dipstick normally has to be unscrewed in some fashion, and must be screwed all the way back in to measure the oil level. Transmission oil needs to be completely clean and still have good viscosity. Again, check the manufacturer’s recommendation on how frequently to change it and add that to your regular maintenance schedule. To check the engine coolant, check the level in the overflow bottle and unscrew the radiator style cap on the top of the engine (Figure 2) to ensure the engine is full and there is not simply some fluid in the overflow bottle. Here too, check the recommended interval for changing your engine coolant.
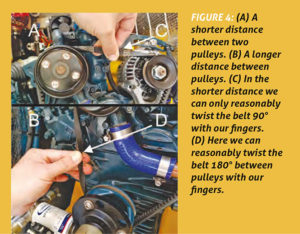
Checking Belt Tension:
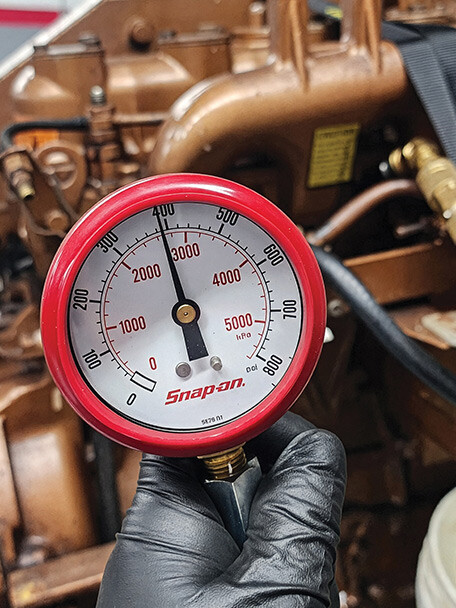
The way we check belt tension is to try to twist the belt 180° in a larger space between two pulleys or 90° in a smaller space (Figure 4). If you can reasonably twist it farther, it is probably too loose. If the belt is squeaking while the engine is running, it is also probably too loose. If you begin to do this check every time you start your engine, you’ll start to recognize if something has changed.
Checking Raw Water Strainer:
To check the raw water strainer, it may be enough to look into it, perhaps, with a flashlight. For a more thorough examination or to clean it, you need to open up the strainer and take it apart. If it is mounted right at the waterline so it does not overflow with the top off, you can do this with the seacock open. If it is below the waterline, you will want to close it first. If you seem to have low water flow through the exhaust and the seacock is open, this is the first thing to check. It may sound like overkill, but we now check the strainer immediately after motoring through a patch of weed or kelp to make sure it didn’t get clogged up and cause an engine over-heat.
Checking Fuel:
When you check the fuel filter, do a visual check to ensure that you don’t see any particles or water. Because water is heavier than fuel or oil, it will collect in the bottom of the filter (Figure 4) where you can drain it out into a container. Follow the engine/filter manufacturers recommendation for how often to change fuel filters. At least once a year at the start of the season is probably a good minimum depending on use. If the diesel in the tank is bad, this can need to be much more frequent.
Checking Batteries:
Check the voltmeter gauge for the controls attach on the engine and transmission. Make sure the connections are secure and have someone move the throttle and shifter controls outside while you watch to make sure they work. Note which direction to move them if you need to do so manually in an emergency if the cable breaks.
Checking for corrosion and leaks:
One can often be a telltale sign of the other. Corrosion next to or below a hose or on a fitting, or around the shaft seal, can actually alert you to the leak causing the corrosion. At other times, seeing the liquid or residue (Figure 2) is all there is to find. Corrosion can also occur from condensation (Figure 1) or from inside the engine because of insufficient anode protection. For more on anodes, refer to our March 2014 48° North article “Know Your Anodes.”
Starting the engine:
Once everything is checked, turn on the engine starting battery with the engine out of gear and at about 1/3 throttle. If your diesel engine has them, engage the glow plugs for 10 seconds, and crank the engine in 15 second intervals until it starts. If it doesn’t start after several tries, shut off the raw-water seacock to prevent the water-lift filling up and backing up into the engine. Make sure you reopen it when you get the engine started. Once the engine is started, throttle back to between 1,000 and 2,000 RPM depending on the engine. Listen to the engine to find the right RPM, it should sound and feel smooth. As the engine warms up you can back down the throttle. As soon as you have the engine at a good RPM, check to make sure water is coming out the exhaust. Then check that the alternator is charging the batteries.
Rechecking Shaft Seal:
With the engine in gear, recheck the shaft seal. If it is a stuffing box, it should not drip faster than 8 or 10 drips a minute while running, but 2 or 3 is preferable. You should be able to hold your hand on the stuffing box (NOT THE SHAFT) while it is running – it shouldn’t be too hot. If you can’t, you may need to loosen it to allow more water through to lubricate it. It should be possible to adjust the stuffing box so it does not drip at all when stopped but drips enough to lubricate it when turning.
 Proper daily use is the first step toward good maintenance and a happy engine. With a little planning and foresight we can keep our engines running as much as we want them to so that we can enjoy our sailing without fuss.